Understanding IP Address Management in Windows Server 2012
If you currently have no means of automatically tracking IP address utilization or are manually recording IP addresses in a spreadsheet, IP address management (IPAM) can help you organize address assignment and plan better for growth.
IPAM provides IT workers with an overview of network infrastructure services, such as Dynamic Host Configuration Protocol (DHCP) and Domain Name System (DNS), and stores information about address assignment. The rapid adoption of virtualization and private clouds adds additional challenges to IP address management, but IPAM steps in to record how resources are being used in constantly changing environments.
IPAM integrates with DHCP and Active Directory (AD) to make it easy for IT workers to search IP address records by IP address, client ID, host name or user name and then export that data to a .csv file. IPAM can store up to 3 years of historical IP address information, including which users were logged on to active IP addresses, providing useful forensic information in the event of an investigation.
Managing the IP Address Space
IPAM provides a framework for managing IP addresses in ranges and blocks. A block is a high-level management feature that allows you to group ranges of IP addresses for convenience. You might define blocks to separate public and private IP addresses or to determine IP address ranges for geographical locations. An IP address range usually matches a particular DHCP scope and can belong only to one IP address block.

Figure 1
When IPAM discovers a DHCP scope on your network, it automatically enters the information into its database. Blocks and individual IP addresses are not added automatically but can be added manually or imported from a file.

Figure 2
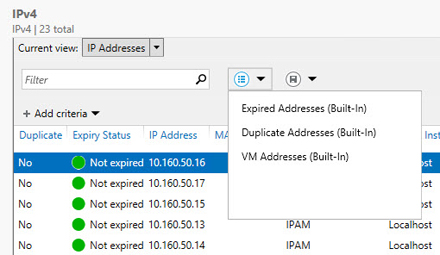
The real power of IPAM lies in its powerful search features, which help you track down how IP addresses are being used, including historical information from the server’s database.
DNS and DHCP Server Management
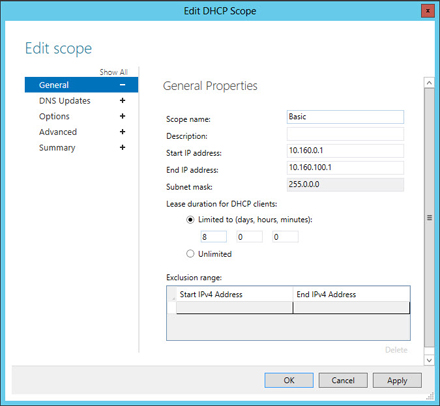
IPAM can monitor multiple DNS and DHCP servers and can provide DNS and DHCP record synchronization and DHCP server and scope management. IT workers have the ability to edit DHCP scope information, and some IPAM management features can be run simultaneously against multiple servers. IPAM supports a maximum of 150 DHCP and DNS servers, 150 DNS zones and 6,000 DHCP scopes. All infrastructure servers, however, must be part of the same AD forest.

Figure 3
Installing and Provisioning IPAM
IPAM should not be installed on a domain controller (DC), but the server must be a member of the domain. While it is possible to install IPAM on a server running DHCP, it is not recommended, because DHCP server discovery will be disabled.
To install IPAM on Windows Server 2012, log on as a domain administrator, open the PowerShell console with administrative privileges and run the following command:
add-windowsfeature ipam –includemanagementtools
IPAM is managed using Server Manager. In the left pane of Server Manager, select IPAM. This will take you to the Overview page. You should see that the IPAM client is already connected to your newly installed IPAM server. Click Provision the IPAM Server and a new window will open:
- Click Next on the Before You Begin screen.
- On the Select Provisioning Method screen, choose Group Policy Based and then enter a prefix, such as IPAM1, in the GPO name prefix box and click Next.
- Click Apply on the Confirm the Settings screen.
- Click Close on the Completion screen.
Back in the PowerShell console, let’s provision the Group Policy Objects (GPOs) that will allow this IPAM server to connect to machines in our domain.
The command needed is:
invoke-ipamgpoprovisioning –domain ad.contoso.com –gpoprefixname IPAM1
Replace the domain name in the command above with your AD domain name; the GPO prefix name must match the name that you specified in the IPAM provisioning wizard. Don’t forget that you will need to either wait for Group Policy to refresh on the servers in your domain or run the gpupdate command manually on each server.
- Back in Server Manager on the IPAM Overview tab, click Configure Server Discovery.
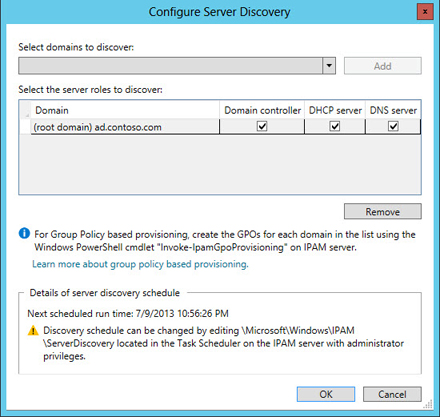
- In the Configure Server Discovery window, select the domain to discover in the Select Domains to Discover drop down menu, click Add and then OK.

Figure 4
- Click Start Server Discovery in the IPAM Overview tab.
- Once server discovery is shown as completed, click Select, or add servers to manage and verify IPAM access and check that the IPAM Access Status field reads Unblocked for any discovered servers.
IPAM Access Status Blocked!
If you see that IPAM Access Status is shown as Blocked for a discovered server, take the following steps on the discovered server to resolve the issue:
- If the discovered server is running DHCP, create a share on the server called dhcpaudit for the path c:\windows\system32\dhcp and give only the IPAMUG group read access.
- On the discovered server, add the IPAMUG group to the following groups: Event Log Readers, DHCP Users and DNSAdmins.
- Add permission for the IPAM server to the CustomSD registry value under HKLM\SYSTEM\CurrentControlSet\Services\EventLog\DNS Server.
- To find the SID of the IPAM server, open a PowerShell prompt and type Get-ADComputer , replacing with the name of your IPAM server.
- Copy the SID from the resulting output and then paste (A;;0x1;;;S-1-5-21-1265560747-2948747198-3383214574-1109) to the end of the existing CustomSD value in Regedit, replacing the highlighted SID with the SID for your IPAM server obtained using the Get-ADComputer cmdlet.
- Reboot the discovered server.
- On the IPAM server on the Server Inventory screen, right click the discovered server and select Refresh Server Access Status in the menu. Wait for the IPAM tasks to finish running, and then refresh the Server Manager window using the refresh icon in the top right of the screen.
Managing a Discovered Server
Now we need to change the status of any discovered servers to Managed. To do this, right click a server in the Server Inventory screen and select Edit Server from the menu.
In the Add or Edit Server window, change the Manageability status to Managed and click OK. Right click the server again, and select Retrieve All Server Data from the menu. Repeat this procedure for all discovered servers. Now you are ready to add IP addresses, ranges and blocks to IPAM.


