How to Set the Windows 7 Desktop Experience
If your business requirements include providing new users with a standardized desktop experience when they first log on to their brand-new Windows 7 PCs, there's some good news and some bad news you need to know.
The good news is that there is a straightforward procedure for customizing what the initial desktop experience for new users will be on Windows 7 computers. The bad news is that you can't do it the way you once did with previous versions of Windows — you have to use a new approach that is more complex and time-consuming.
But at least the new approach works. The old method, used since the days of Windows NT (creating a dummy admin account on your master installation, manually customizing the desktop and then copying the user profile of the dummy account over the default user profile on the machine), often led to strange behaviors and unwanted artifacts. For example, the user's My Documents folder was sometimes displayed as Administrator's Documents in Windows Explorer. These hiccups don't occur when the new approach is used.
The Good News
While you can certainly build your Windows 7 desktop image from scratch if you choose, the easiest way to do this is to use the Microsoft Deployment Toolkit (MDT), which is freely available from Microsoft.
Once you've installed MDT on a computer, simply create a deployment share, import the Windows 7 source files, add any applications and out-of-box drivers users will need on their computers, and create a task sequence for deploying Windows to those computers. Detailed walk-throughs using MDT to deploy Windows 7 in various scenarios can be found in a series of articles I have written on this subject.
To customize the initial desktop experience for users, you must make modifications to the default user profile of the Windows image you will be deploying to their computers. The reason for this is because when a user logs on to a Windows computer for the first time, the default user profile on the user's computer is used as a template for generating that user's own personal user profile (a user profile defines how the Windows desktop looks and behaves for a user).
Here are the steps involved in customizing the default user profile for deploying Windows 7 using MDT:
- Create a task sequence based on MDT's Standard Client Task Sequence template for deploying your master installation (that is, the "gold" image of Windows you plan to deploy to all your users' PCs).
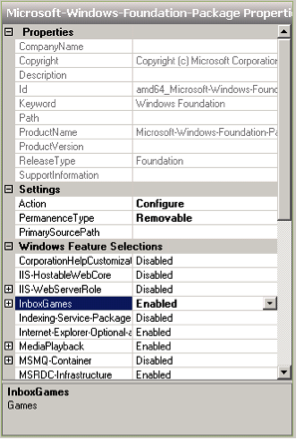
- Use Windows System Image Manager (Windows SIM) to edit the answer file (unattend.xml) for this task sequence to customize such things as which Windows features will be available for the user, which shortcuts are pinned to the Start menu and taskbar, and so on. Figure 1 shows an example of editing the answer file to enable the Games feature of Windows (something that may not be a good idea if your users are Solitaire addicts).

Figure 1: Providing support for Solitaire addicts in your office - Deploy your master installation using your task sequence and verify the customizations. For example, you should now be able to play Solitaire on your master installation (don't).
- Create a second task sequence based on MDT's Sysprep and Capture task sequence template and use it to sysprep your master installation, capture its image and upload the captured image to the Captures folder in your deployment share.
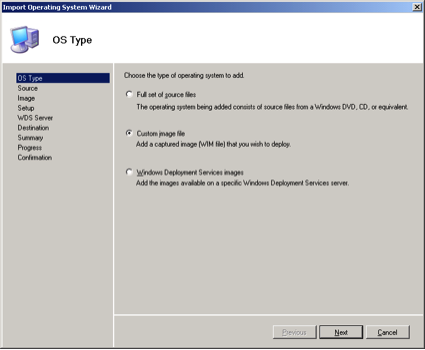
- Import the captured image into MDT's Deployment Workbench using the Import Operating System Wizard, being sure to select Custom Image File as the OS type being imported (see Figure 2).

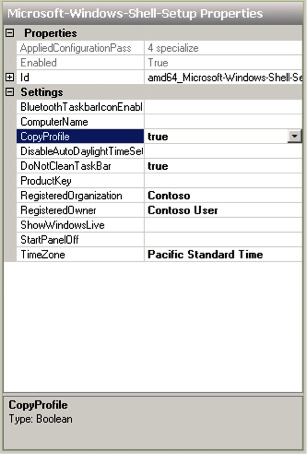
Figure 2: Importing the captured, sysprepped master installation into the Workbench - Create one more task sequence based on MDT's Standard Client Task Sequence template. Use Windows SIM to edit the answer file for this task sequence by setting CopyProfile to true in the answer file (see Figure 3). This is important: If you don't perform this step, none of your desktop customizations will be copied to the default user profile.

Figure 3: Set CopyProfile to true if you want your customizations to be applied to the default user profile - Now use the third and final task sequence to deploy your customized, sysprepped, captured, imported gold image of Windows 7 to all your users' PCs. When they log on for the first time, they should have the customized desktop experience you desire.
The Bad News
Simple, isn't it? Well, not quite. First, before you can use this approach you'll need to become really familiar with each and every single answer-file setting for Windows 7, and there are a lot of them. If you have a free weekend you might try reading through the entire Unattended Windows Setup Reference, a Help (.chm) file included with the Windows Automated Installation Kit for Windows 7, which MDT downloads and installs on your system.
What if there is some aspect of the Windows 7 desktop experience you can't customize using the answer file? In that case, you'll need to find out which current-user registry settings are involved and add a script to your first task sequence to automatically deploy those registry changes to your gold image.
Of course, you could instead add an additional step between steps 3 and 4 of the above procedure in which you perform manual customizations on your master installation, but then you'll need to add another step between steps 6 and 7 to deploy your image to a test computer to find out if your manual customizations were successfully applied to the default profile. And adding manual steps to any procedure always slows things down a lot.
Finally, what if you don't want to go through the headache of building and rebuilding your customized Windows image each time you want to make changes to users' initial desktop experience? In that case, you might want to try using MDT to deploy a plain-vanilla, uncustomized Windows image instead — with applications and out-of-box drivers — to users’ PCs, and use Group Policy preferences to perform any initial configuration needed for users' desktops.
Group Policy is a powerful tool that can be used to create drive mappings, desktop shortcuts, network connections, printers and even registry settings on users' PCs, and it provides an alternative approach to the whole idea of customizing the initial desktop experience of users on Windows-based computers.


