Be the Boss of Backup Exec
In the area of enterprise backup software, Backup Exec has been a market leader for more than two decades. Kim and Alison Knapp developed the first iteration of the tape-based system, known as MaynStream, in their family room in 1982. Through subsequent ownership by Maynard Electronics, Archiv, Conner Peripherals, Seagate, Veritas and finally Symantec in 2005, what came to be Backup Exec has long been a go-to application in the IT industry.
Backup Exec 11d
Symantec released Backup Exec 11d in November 2006 with expanded platform support for IBM DB2, Mac OSX, HP-UP, Solaris 10 and Suse 10.0 clients; and more granular data recovery, especially for Exchange.
Backup software is subject to the same Pareto principle as all other software: Eighty percent of the user base needs 20 percent of the features. This article will focus on how to get the maximum from the other 80 percent of the feature set, as well as how to use Backup Exec to cope with ever-growing data backup sizes and shrinking backup windows.
The strategy hinges on three steps that can be used independently or together to form a solid backup and data retention plan:
- Step One: Use backup-to-disk features to expand native backup-set capacity and single-media backups of large data sets.
- Step Two: Configure the Backup Exec Advanced Disk-based Backup Option (ADBO) add-on feature to perform synthetic backups offline to get around short backup windows.
- Step Three: Configure backup-to-disk-to-tape for data archival and offsite storage of backups.
Whether using a storage area network, networked access storage or removable external disks, backup-to-disk (B2D) has several advantages. Cheap, large capacity drives accept large data sets in a single session with no media changes. Backup-to-disk data transfer speeds are faster than almost all tape devices except for high-end tape drives. Last, B2D can be a cheap, intermediate stage to quickly capture a backup set for later offline transfer to tape media for archiving.
Configuring Backup-to-Disk
First, choose a B2D option. You can configure B2D two ways: as a standard folder or as a removable folder. A standard B2D folder writes to a folder on a fixed drive, either locally or on the network. Removable B2D is useful for all types of removable media, such as REV, CD-RW and DVD-RW; and removable disks, such as RDX and GoVault systems.
The main difference is that standard B2D supports concurrent backup operations and removable B2D does not. Smaller removable B2D media can span a single job across several media, as can a tape backup.
You can use the setup wizard, located in Tools:Wizards, to do the initial setup of the B2D folder.
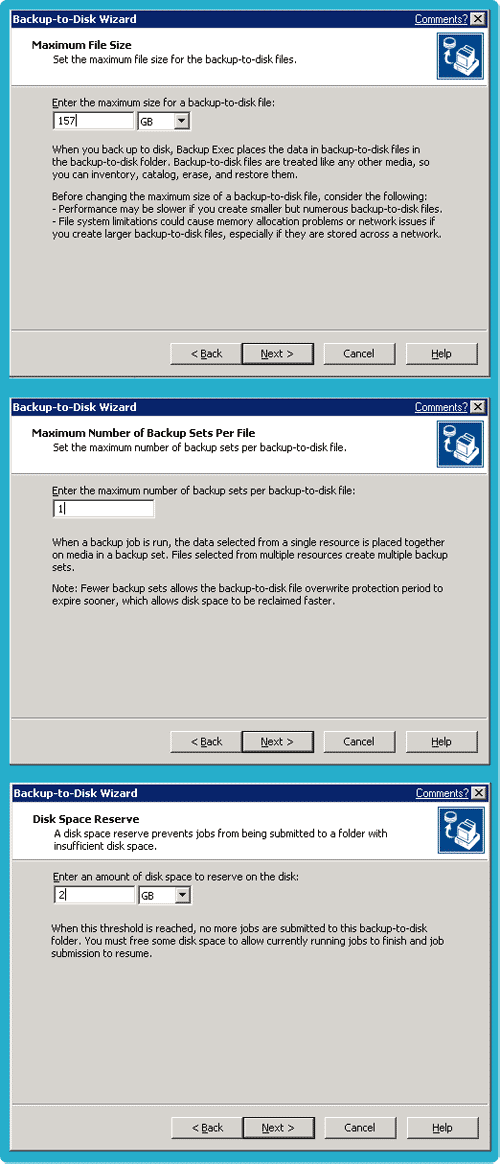
For a successful setup, modify the default options of the wizards. After you have selected a name and a root drive (backup exec does not support UNC paths here), you will want to enlarge the default maximum file size of the B2D files (the default is 1 gigabyte for each backup file). The advantage of a larger file size is a faster backup. But file size and disk capacity limitations can put an upper limit on some systems. As an example, we will configure B2D for a 160GB removable disk drive.
B2D Wizard Configuration Options
Using the 160GB drive as an example, we can set a maximum of 157GB on each backup file. We will set the maximum number of backup sets per file to one for this scenario because we will be running full backups to the removable media and overwriting each time. For larger or nonremovable drives, feel free to use more liberal settings. The default is 100, which might be excessive for many people.
Last, we will reserve 2GB (1.25 percent of capacity) per disk as a fudge factor. In most instances, this will prevent applications from reporting disk-capacity errors.
The options are basically the same for standard B2D folders, except that an additional option for the number of concurrent jobs will be offered. Be particularly careful when assigning maximum capacities and reserved space on local hard drives. I strongly discourage configuring B2D folders on drives where the operating system resides.
Now, all you need to do is configure your backup jobs as normal. Just be sure to select the appropriate overwrite protection options to match your backup model — daily full, weekly full with daily incremental, and so forth.

Figure 1
TROUBLESHOOTING NOTE: During testing or initial runs, you may find that B2D jobs hang in the queued state and don’t run. You can typically fix this by modifying the advanced properties of the B2D folder and unchecking the Auto-Detect settings box while leaving Buffered Reads and Buffered Rights checked. You can access the Advanced tab in the Media pane. In some cases, deleting and recreating the B2D folder may be necessary.
Using Advanced Disk-Based Backup Option
The Advanced Disk-Based Backup Options (ADBO) in Backup Exec let users combine one or more partial backup jobs as a complete backup offline. A typical scenario for using ADBO would be in environments that have large data sets and short backup windows.
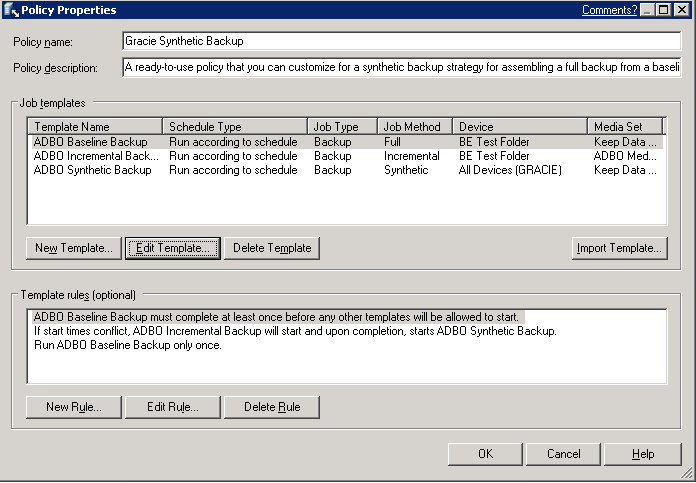
The key to ADBO is the synthetic backup, which consists of three components: the baseline backup that needs to be run only once, recurring incremental backups, and recurring synthetic backups that bring everything together into a complete backup from which partial or full restores can be made. The incremental backups must have a B2D destination that is an NTFS volume. (See below for transfer to tape.)
Policy Properties Window
Select each template and configure the options and the run schedule for each backup type. Remember: The baseline backup must run first and need be run only once in any backup cycle. It cannot run concurrently with an incremental backup. The documentation says that incremental policies will run automatically after a baseline backup if there is a conflict. But why take chances? Put your schedule together thoughtfully.
Next, create your backup selection list as you would for a normal backup job. Keep in mind the limitations of synthetic backups outlined above as you configure your selection lists.
Once the templates are configured, select New Job from Policy, either by File:New:Job Using Policy or through the Policy Tasks task pane. A dialog box will ask for the selection list to be associated with the policy.
Backup Exec will then populate the Job Setup and Job Monitor panes with the appropriate three job categories and schedules. The baseline backup will run first. Incremental backups will run as frequently as you set them. Finally, the synthetic backup will run and create a complete image that can be used with True Image Restore. You will also be able to restore individual files, folders and volumes.

Figure 2
TROUBLESHOOTING NOTE: ADBO synthetic backup does not support database resources or other unique, non-file-system-related resources. It will back up volumes, drives, folders and your system state. It does not work with databases or Microsoft Exchange stores and data. Backup Exec includes a pre-set policy with attached templates for defining your synthetic backups. This is a good place to start an initial configuration and testing of ADBO.
To customize it for your own needs, select Tools:Recreate Example Policies. This will place the pre-set example policy, called Synthetic Backup. Within it are job templates for the baseline, incremental and synthetic backups. Access these by right-clicking the policy and selecting Properties.
Correctly Configured Synthetic Backup Job Monitor

Figure 3
Backup-to-Disk-to-Tape
Many companies need long-term data retention at secure, off-site locations. Off-site backup is a best practice for disaster recovery. Once you have set up synthetic backups or policy-based disk backups, you can write to tape for off-site storage at your leisure.
The simplest way to create the backup-to-disk-to-tape model is to first enable a synthetic backup. Open the properties of the Synthetic Backup Template in the Synthetic Backup Policy and, in the Device dropdown menu, select the tape device or auto-loader to which you wish the synthetic backup to run. This will automatically write your completed synthetic backup to tape as the destination.
For added convenience, write the synthetic backup to disk and then create a duplicate synthetic backup job that can be run after the first synthetic backup, and choose the tape device as the destination.
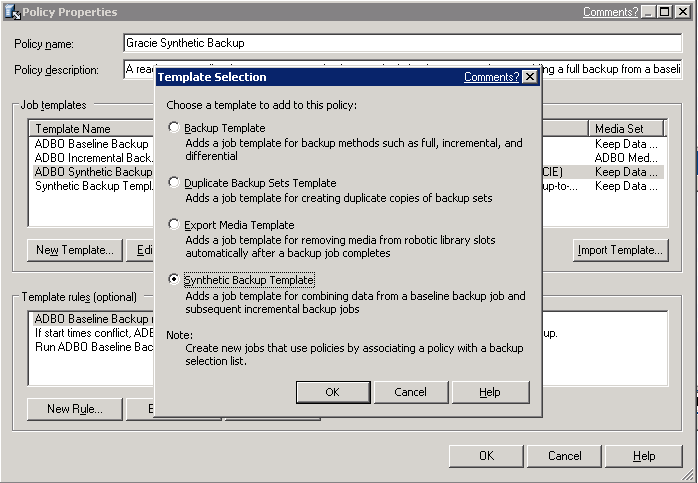
To enable this, open the Synthetic Backup Policy and click the New Template button. The application will present a dialog asking for the type of template to add. Select synthetic backup. Once the new template is created, modify the device setting to target the tape library.
Adding a Synthetic Backup Template To a Policy
The policy is linked to the backup selection set. All that is left to do is to schedule the template for the runtime that you desire. You can also use the rules buttons below the templates list to set rules for when jobs run. For example, set a rule so that the synthetic B2D must complete successfully before the synthetic backup to tape will run at all.

Figure 4
CDW PRICE: $666.99


