6 Easy Ways to Make Your Mac More Secure
For most IT workers, securing a Windows or Linux computer is a reflexive action. But when it comes to Macs, users often don’t take the few extra steps to implement basic security measures; they either assume that Macs are inherently more secure than Windows PCs (they may or may not be, but that’s not an argument I want to tackle here), or they simply don’t know about the Mac’s built-in security features.
While I could go into some very complex instructions for overriding your Mac’s defaults and getting some extra security by manipulating your configuration through the command line, I just want to go through some of the most effective things any intermediate Mac user can do.
1. Upgrade to a Supported Version of OS X
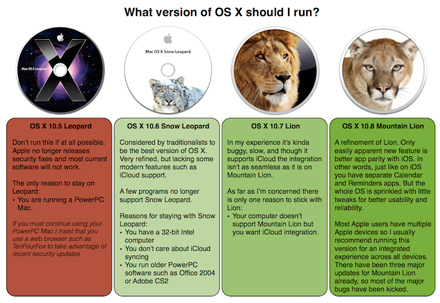
As of today, only Mac OS X 10.6 (Snow Leopard) and beyond are receiving security updates from Apple. Many programs, such as Firefox and Chrome, have followed suit by dropping development for systems prior to 10.6. If you aren’t running at least Snow Leopard, I recommend you upgrade as soon as possible. Any Intel Mac is capable, though a RAM upgrade might be required.
Upgrading to OS X 10.7 (Lion) or 10.8 (Mountain Lion) has security benefits as well. The Mac’s encryption system, FileVault, received an overhaul with Lion, which is now faster, more reliable and more secure. Apple has also made it more difficult to perform brute-force attacks against a local user account.
If you are unable to upgrade to Snow Leopard because of incompatible software or because you’re still running a PowerPC system, I strongly recommend that you run an alternative web browser, such as TenFourFox; enable the built-in Firewall; and use a virus scanner.
If you are running an old version of Mac OS X and aren’t sure about which upgrade path to take, here are my recommendations:
2. Create a Login Password
If you’re able to simply press return when prompted for an administrator password (or if you’re using a common password, such as “password” or “qwerty”), your computer is wide open to exploitation — far more than you might realize. Even if you aren’t aware of any sensitive documents, having a blank password allows anyone to easily retrieve any passwords stored in your account. This is likely to include website and email passwords, as well as your Skype, VPN and financial account information. This information can then be used to access sensitive content elsewhere or to steal your identity.
To create or change your password, go to the Apple menu > System Preferences > Users & Groups. Choose your name from the left column and then click the Change Password button. I always recommend changing only the password for the currently logged in account. You can change the password for other accounts, but there can be hiccups with that approach. To seamlessly change the other accounts, log in to them first.
OS X has no minimum standards for a password, so I recommend that you follow good password standards, such as combining letters and numbers, using multiple words and not reusing passwords.
3. Disable Automatic Login
If you are a longtime Mac user, your account is probably configured to automatically log in when you turn on your computer. Until recently, that was the default. Though not quite as egregious as having a blank or simple password, having this “convenient” feature turned on is nearly as bad.
To disable automatic login at boot, go to the Apple menu > System Preferences > Users & Groups > click Login Options on the left column > switch Automatic Login to Off.
4. Enable FileVault
Setting a password for your account only prevents someone from casually sitting at your computer and opening files. It does not encrypt your data. Anyone can enable Target Disk Mode or remove your drive and plug it into another computer, gaining full access to all of your content. To safeguard all of your data, especially on a portable Mac that can be easily stolen, I highly recommend enabling FileVault, which offers virtually hack-proof encryption, with only a little overhead.
If you previously enabled FileVault using Snow Leopard or an earlier OS, I suggest you upgrade from FileVault 1 to FileVault 2 in the Security & Privacy section of System Preferences.
To enable FileVault, go to the Apple menu > System Preferences > Security & Privacy > FileVault tab and click the Enable FileVault button. The computer will walk you through the configuration. Be sure to make a hard copy of the recovery key, and keep it in a secure place, such as a safe: If you lose your password and recovery key, there is no way to recover the contents of your computer.
You can continue using your computer while FileVault encrypts your drive in the background.
5. Deploy External Disk Encryption
OS X Lion or higher can encrypt full external (or secondary internal) disks using the same technology as FileVault. There are a few things to know before continuing:
- Once the drive is mounted on your computer, all users (including remote users) will have access to the drive.
- Only OS X Lion and later can read the disk.
- It only works on a drive that has a GUID partition table and a Mac OS Extended file system. If your disk doesn’t meet those conditions, you’ll need to back up your drive and then repartition using Disk Utility.
To encrypt a disk, simply right click it in Finder, choose Encrypt [diskname] and follow the instructions.
6. Activate Find My Mac
If your Mac is lost or stolen, you might be able to locate your computer using the same system that is used with Find My iPhone. Once located, you can display a message, check some stats or even remotely wipe your drives to prevent your data from falling into the wrong hands.
To enable Find My Mac, go to the Apple menu > System Preferences > iCloud. Log in to your iCloud account if it isn’t already enabled. Check the box next to Find My Mac. If there is a warning symbol there, it will probably tell you that you need to have location services enabled — which are in System Preferences > Security & Privacy > Privacy — in order for Find My Mac to work. Then, test it out to make sure it’s working.
To use Find My Mac, log into icloud.com from any modern web browser on any computer or by using the Find My iPhone app for iOS. Note: The minimum OS standard for running Find My Mac is Lion. So if you want to take advantage of this feature and running on Snow Leopard, you’ll need to upgrade your OS.


