Absolute Power

Windows PowerShell is rapidly becoming an important tool for administrators who need to manage servers and perform other tasks. That's because PowerShell, which is built on top of Microsoft's .NET Framework, is far more powerful than cmd.exe, the lowly Windows command prompt.
Using PowerShell can help you create scripts that automate common administrative tasks and make your life as an admin a lot easier. But to really get the most out of PowerShell, you not only have to know the basics of its syntax, but also how to work efficiently using its features and capabilities. Here are four tips to help you get the most out of PowerShell even if you are still a relative novice on the subject.
1. Ditch the Command Prompt
The Windows PowerShell console (powershell.exe) includes all the command functionality available from the Windows command prompt (cmd.exe). This means you can run commands such as dir, ping and netsh directly from the PowerShell console without opening a separate command prompt window. So if you're a novice, you should begin your journey into PowerShell by ditching the command prompt once and for all.
2. Leverage What You've Learned
Not only does the PowerShell console let you run ordinary Windows commands, it also supports the same features found in the Windows command prompt itself. This means that if you're already a power user when it comes to the Windows command prompt, you can utilize your skills with the PowerShell console too.
For example, if you run a PowerShell command that generates continuous output, you can temporarily pause the display of command output by pressing CTRL+S. To resume, press CTRL+S a second time. And of course you can terminate output and abort the command by pressing CTRL+C, just as you would if using a command prompt window.
The PowerShell console also stores recently executed commands in a buffer, just as the command prompt window does, and you can move back and forth through the buffer by pressing the up and down arrow keys. And much the same as the command prompt, you can change the size of the buffer and other display properties by right-clicking on the title bar of the PowerShell console and selecting Properties.
If there are a lot of commands in the buffer and you don't want to keep pressing the up and down arrow keys to find the command you want to run, you can press F7 to display a list of buffered commands to choose from (see Figure 1). Then either use the up/down arrow keys to select the command you want, followed by pressing ENTER, or press F9 and type the number of the command, followed by ENTER.
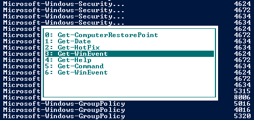
Figure 1: Quickly access commands from the PowerShell console command buffer.
The PowerShell console also has the same kind of auto-complete functionality that the command prompt supports. For example, you can type get-h and then press TAB to cycle through all commands that begin with this string, including Get-Help, Get-History, Get-Host and so on. And if you know that the command you want to run is already in the buffer, you can type get-h and press F8 repeatedly to cycle through buffered commands that match this string. (You should note that PowerShell commands are typically case-insensitive; typing Get-Help, get-help or even geT-Help at the command prompt will yield the same result.)
The PowerShell console differs nicely from the Windows command prompt in that PowerShell is more selective in what it displays using auto-complete, it doesn't display DLL files, and only displays PowerShell commands and other executable files such as .exe, .com, .msc and .cpl files, plus a few additional things such as drive letters and known folders.
3. The Advantage of Aliases
PowerShell commands are called cmdlets (pronounced "command-lets") and typically have names in the form verb-noun, in which verb is the action being performed and noun is the thing being acted on; for example, Get-Command and Write-Output. Typing the full names of cmdlets can be tiring, especially if you are working from specialized PowerShell consoles such as the SharePoint 2010 PowerShell console, which includes cmdlets such as New-SPBusinessDataCatalogServiceApplicationProxy, Remove-SPEnterpriseSearchCrawlCustomConnector and Get-SPEnterpriseSearchExtendedClickThroughExtractorJobDefinition.
To make life easier, PowerShell includes pre-defined aliases, which are shortcuts for common cmdlets. For example, instead of typing the full cmdlet Get-Command, you can type the alias gcm to display a list of available cmdlets. To display a list of pre-defined aliases, type Get-Alias; or even better, type gal, which is the alias for Get-Alias. You can even create your own aliases by using the New-Alias cmdlet. For help on how to work with aliases, type help about_aliases in the PowerShell console and press the spacebar to scroll through the help output one page at a time.
This brings us to PowerShell's help system, which is far superior to that for the Windows command prompt. You can practically learn PowerShell from scratch just by accessing the help system as you need it. For example, to display all help topics, type help *; to read a particular help topic, type help followed by the name of the topic.
4. The Power of Profiles
Any aliases (or variables or functions) you define in the PowerShell console last only as long as your current PowerShell session. Close the console and all your aliases vanish. Fortunately, PowerShell includes a Profiles feature that you can use to make your aliases permanent. Your personal, per-user PowerShell profile (if you have one) is stored as a file named Microsoft.PowerShell_profile.ps1 within a subfolder named WindowsPowerShell in your My Documents folder. The path to your personal profile is saved in a PowerShell variable named $profile. By default, you don't have a PowerShell profile, but you can create one by typing new-item -path $profile -itemtype file –force in the PowerShell console and then typing notepad $profile to open your new, blank profile using Notepad. You can then type in PowerShell code that can be used to customize the appearance, behavior and functionality of the PowerShell console.
For example, instead of having the title bar of your PowerShell console display "Administrator — Windows PowerShell", you can make it display the Windows Unified Naming Convention (UNC) name of the computer you are working on by adding the following line of code to your profile:
$host.UI.RawUI.WindowTitle = "$env:computername"
Figure 2 shows the original console and the new one for comparison.
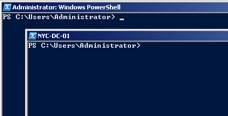
Figure 2: Custom title bar for PowerShell console
You might have to change the execution policy of your PowerShell console to Unrestricted to make this work (type Get-ExecutionPolicy to display your current execution policy and type help Set-ExecutionPolicy for instructions on how to change it). Alternatively, you could “sign” your policy file and keep your execution policy set to Restricted (type help sign to learn more about signing PowerShell scripts). Finally, you can also create profiles that apply to all PowerShell consoles you use on your system, to all users of the default PowerShell console, or to all users of all PowerShell consoles. See this MSDN article for more info.