Windows Server 2012: How Active Directory Administrative Center Has Changed
Active Directory is the foundation on which most Windows-based networks are built. Businesses both large and small use it, with the possible exception of very small businesses, such as home-based enterprises, that may simply deploy Windows computers as a workgroup.
Even if your business has only 50 to 100 users, managing Active Directory can mean plenty of tedious, repetitive work. User accounts need to be created and configured, passwords need to be reset and group memberships need to be updated over time.
Larger businesses have to deal with even more Active Directory administration tasks, including creating and populating organizational units (OUs) with users and computer accounts, delegating control over OUs so others can manage their objects, configuring sites and site links in distributed WAN environments and so on.
Prior to Windows Server 2008 R2, most Active Directory management was performed using several different Microsoft Management Console (MMC) snap-ins, a variety of different command-line utilities, third-party Active Directory management products or some combination of the above.
The MMC snap-ins were easy to use for one-off manual tasks but cumbersome for repetitive tasks. Command-line utilities such as ldifde and dsadd could be used to automate a number of common administrative tasks, but the syntax varied greatly among different tools. Some third-party vendors had products that were great for automating Active Directory management but required administrators to shell out extra bucks to use them.
But starting with Windows Server 2008 R2, automating Active Directory management got a whole lot easier in two ways.
First, Microsoft introduced a new Active Directory Administrative Center (ADAC) as the go-to tool for performing the daily tasks of Active Directory administration. Second, Microsoft included an Active Directory module for Windows PowerShell that allowed administrators to perform many management tasks from the command-line or, even better, write scripts that could be used to automate repetitive tasks. However, you still had to choose between using the ADAC to manually perform tasks one at a time; using Windows PowerShell to perform tasks from the command line; or automating them with the use of scripts.
This division of labor between the ADAC and Windows PowerShell meant that administrators who were unfamiliar with Windows PowerShell were placed at a significant disadvantage.
ADAC in Windows Server 2012
The ADAC has now been enhanced in Windows Server 2012 with the inclusion of a new feature called the Windows PowerShell History Viewer. To understand what the History Viewer does and how it can be useful, I'll create a new user account using the ADAC.
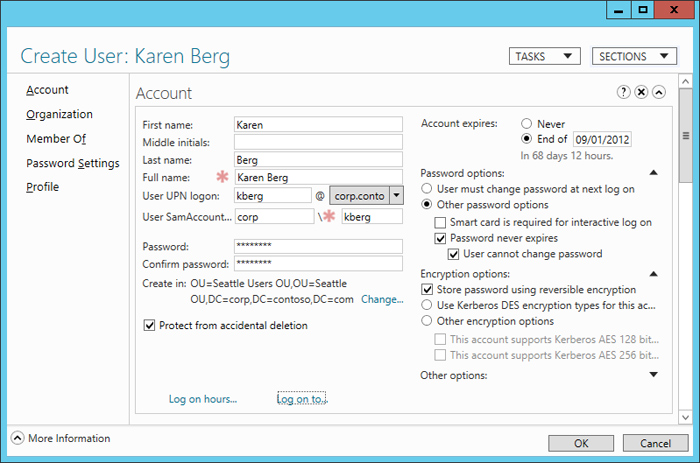
Figure 1 shows the Create User task page being used to create a new user account for Karen Berg, a user in the Seattle Users OU of the corp.contoso.com domain. By scrolling through this task page, you can manually specify the new user's account, organization, membership, password and profile attributes.

Figure 1: Creating a new user account for Karen Berg.
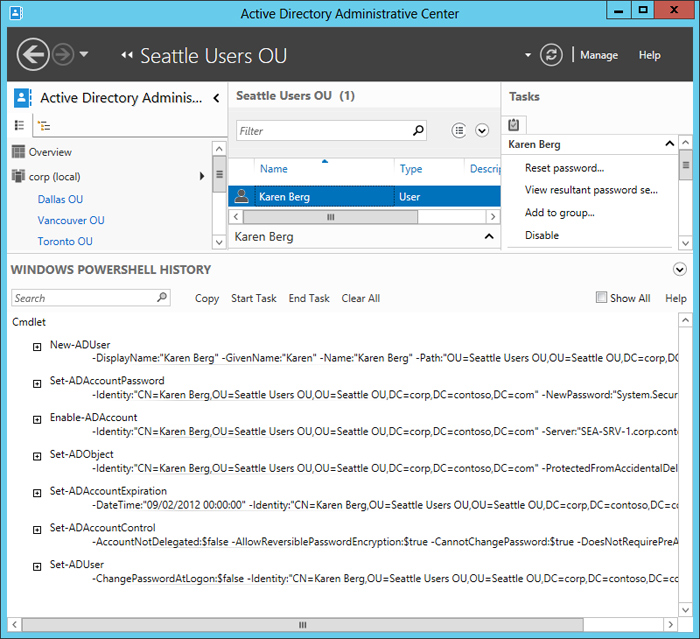
Once I've finished configuring the attributes of the new account, I click OK to return to the ADAC. At that point, if I click the caret symbol (^) in the bottom right-hand corner of the ADAC, the Windows PowerShell History is displayed, as shown in Figure 2. The Windows PowerShell shows all of the Windows PowerShell commands that were performed behind the scenes during the process of creating the new user account.

Figure 2: The Windows PowerShell History showing the commands used to create Karen's account.
One obvious benefit of the Windows PowerShell History is that it helps Windows PowerShell novices learn more about the Windows PowerShell cmdlets in the Active Directory module. But there's more.
If I click Copy in the Windows PowerShell History toolbar, I can copy the contents of the history to the clipboard. I can then paste the clipboard contents into a text editor, such as Notepad.
New-ADUser -DisplayName:"Karen Berg" -GivenName:"Karen" -Name:"Karen Berg"
-Path:"OU=Seattle Users OU,OU=Seattle OU,DC=corp,DC=contoso,DC=com"
-SamAccountName:"kberg" -Server:"SEA-SRV-1.corp.contoso.com"
-Surname:"Berg" -Type:"user" -UserPrincipalName:kberg@corp.contoso.com
Set-ADAccountPassword -Identity:"CN=Karen Berg,OU=Seattle Users OU,
OU=Seattle OU,DC=corp,DC=contoso,DC=com" -NewPassword:"System.Security.SecureString"
-Reset:$null -Server:"SEA-SRV-1.corp.contoso.com"
Enable-ADAccount -Identity:"CN=Karen Berg,OU=Seattle Users OU,
OU=Seattle OU,DC=corp,DC=contoso,DC=com" -Server:"SEA-SRV-1.corp.contoso.com"
Set-ADObject -Identity:"CN=Karen Berg,OU=Seattle Users OU,
OU=Seattle OU,DC=corp,DC=contoso,DC=com" -ProtectedFromAccidentalDeletion:$true -Server:"SEA-SRV-1.corp.contoso.com"
Set-ADAccountExpiration -DateTime:"09/02/2012 00:00:00" -Identity:"CN=Karen Berg, OU=Seattle Users OU,OU=Seattle OU,DC=corp,DC=contoso,DC=com"
-Server:"SEA-SRV-1.corp.contoso.com"
Set-ADAccountControl -AccountNotDelegated:$false -AllowReversiblePasswordEncryption:$true
-CannotChangePassword:$true -DoesNotRequirePreAuth:$false
-Identity:"CN=Karen Berg,OU=Seattle Users OU,OU=Seattle OU,DC=corp,DC=contoso,
DC=com" -PasswordNeverExpires:$true -Server:"SEA-SRV-1.corp.contoso.com"
-UseDESKeyOnly:$false
Set-ADUser -ChangePasswordAtLogon:$false -Identity:"CN=Karen Berg, OU=Seattle Users OU,OU=Seattle OU,DC=corp,DC=contoso,DC=com"
-Server:"SEA-SRV-1.corp.contoso.com" -SmartcardLogonRequired:$false
At this point, I can do one of several things. First, I could make some changes to the above series of commands, for example, by changing the user's name and account name attributes. I could then run the commands again to create a second user with very little additional effort.
Alternatively, I could use the above series of commands as a template for generating a script that could be used to create new users in bulk, just by performing a single operation. As a simple example, the following command reads information from a comma-separated (CSV) text file, pipes the information into the New-ADUser cmdlet to bulk create new users, configures the password for each new user account as Pa$$w0rd and enables the new accounts.
Import-Csv C:\data\info.csv | New-ADUser -PassThru | Set-ADAccountPassword -Reset
-NewPassword (ConvertTo-SecureString -AsPlainText "Pa$$w0rd" -Force)
-PassThru | Enable-ADAccount
The information contained in the CSV file might look something like this:
Name,GivenName,Surname,SamAccountName,UserPrincipalName
Arno Bost,Arno,Bost,abost,abost@corp.contoso.com
Peter Fischer,Peter,Fischer,pfischer,pfischer@corp.contoso.com
Manish Chopra,Manish,Chopra,mchopra,mchopra@corp.contoso.com
Another approach you could follow for bulk user account creation would be to first create and configure a template user account that has the account expiration date, password options and other attributes common to all the new accounts you will be creating.
You could then use Windows PowerShell together with a CSV file to leverage your template account to bulk create new users from it. To learn how to do this and other Active Directory management tasks using Windows PowerShell, see my new book Installing and Configuring Windows Server 2012 Training Guide from Microsoft Press.


