Taming the Mail Beast in Mac OS X Mountain Lion
If you had to guess, what is the most-used piece of software in your company? If you said email, you’re spot on. According to recent estimates, business users send or receive 112 e-mails a day, on average.
That number might sound high, but not when you consider that the inbox is where leads, partnerships, research and ideas are hashed out. But for all of its corporate value, email is also an incredibly personal tool, which means it’s important to make sure that your email client works for you.
Mac users have a wide variety of email applications to choose from, such as do-everything Outlook, open-source Thunderbird or minimalist Sparrow.
Personally, I prefer Apple’s built-in software, which is simply called Mail. It’s straightforward and easy to use, and, with a little tweaking, it works seamlessly with my Apple-centric workflow.
While Mail is a great little program, it’s full of hidden features. Here are some of my favorite tips to get the most from Mail:
(NOTE: I’m using the latest system, OS X 10.8 Mountain Lion; if you are using another version, the specifics or availability might vary.)
1. Customize the Toolbar
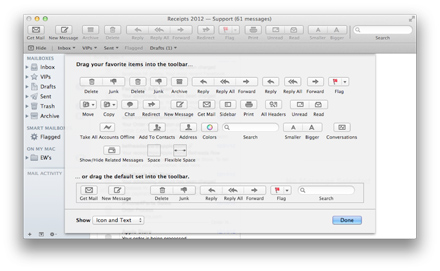
By default, Mail displays only a few buttons on the toolbar, but you can easily add other buttons by clicking Customize Toolbar in the View menu. Some of my favorites are Print, Redirect, Smaller/Bigger, Archive, Read/Unread and Get Mail. You can also choose to show the text under the icons.
2. Set Up Redirects
Sometimes I receive an email that should have been sent to someone else. Choosing the Messages menu > Redirect works much the same as Forward except, in this case, the Reply- to field is filled in as the original sender and the message is not indented. I find this particularly useful when the person I forward to is not computer savvy and is likely to respond to me instead of the person whose email I’m forwarding.
3. Turn Conversation View On or Off
Conversation View lumps messages together with the same subject line and in the same mailbox to show each email topic as a naturally flowing conversation, almost as if you are using an instant-message client. Many people find this feature, first introduced in Gmail, to be a godsend. For others, it’s a nightmare.
Fortunately, those who find it annoying can turn it off. From the View menu, click Organize by Conversation to uncheck it. Note that this is a preference that is set folder by folder, which is handy for me because I prefer my inbox to be in Conversation View but my tax mailbox to show item by item.
If you like Conversation View, you can go a step further and see all related messages across all mailboxes (including your sent messages) by clicking the View menu and selecting Show Related Messages. This can be enabled permanently in the Mail menu > Preferences > Viewing > View Conversations > Include related messages.
4. Search Shortcuts
Ever since Google brought the power of search to email with the Gmail revolution, I’ve been a firm believer in keeping my mailboxes in check by relying on the Search function. Aside from a mailbox for tax-related email, I search for everything.

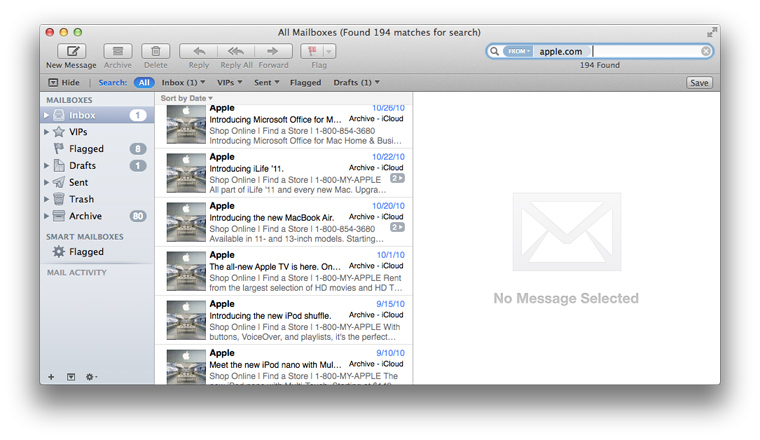
Begin by typing keywords or names into the Search bar in the upper right corner of the Mail window and experimenting with the different buttons and menus that appear. The intricacies of what you can do in Search go well beyond what I can tell you in this brief article, but the two key places to look are in the drop-down list that appears while you are typing or in the shortcut bar that appears above your search results.
You may also want to save your search using the Save button that appears under the Search box. This creates a Smart Mailbox, which looks like a regular mailbox excep it's represented with a gear icon and updates dynamically.
5. Archive Your Worries Away
When I have acted on an email, I don’t fret over where to file it. I just archive it. If I need it later, I search for it (see previous tip). Mail’s Archive button simply moves an email into a folder called Archive. If you don’t see an Archive button, you can add it to your toolbar (refer to my first tip in this article).
6. Automating Contact Photos
Seeing contact photos in your inbox sounds superfluous, but I find that seeing a thumbnail photo of your contacts makes it significantly easier to browse through your messages quickly. If you have Facebook contact syncing turned on (Apple menu > System Preferences > Mail, Contacts & Calendars), you won’t even have to set the photo manually for many of your contacts.


